The DJ mixer is a vital tool in a DJ’s setup, enabling the DJ to manipulate and blend multiple audio sources. The mixer is used to combine two or more audio signals, adjust their levels, and apply effects to create a seamless mix. There are different types of DJ Mixers, including two-channel and four-channel mixers, each with its unique features and capabilities. Understanding the layout and controls of a DJ Mixer is crucial for a DJ to create a seamless mix.
Understanding the Layout of a DJ Mixer
A typical DJ Mixer consists of several sections, each with its specific controls and functions. Here’s a breakdown of the different sections of a DJ Mixer:
Input channels
The input channels are where you connect your audio sources, such as turntables or CD players, to the mixer. Each channel has its gain control, high, mid, and low EQ controls, and a channel fader.
EQ controls
The EQ controls play a crucial role in shaping the sound of your mix. By adjusting the high, mid, and low EQ controls, you can boost or cut specific frequency ranges to create a unique and dynamic sound. It’s essential to experiment with different EQ settings to find the right balance and make sure that each track in your mix sounds great. Remember that EQing is not just about boosting frequencies but also about cutting frequencies that may be clashing with other tracks in your mix.
Faders
The faders allow you to mix the audio signals from two or more channels by adjusting their volume levels. By moving the faders up or down, you can bring in or fade out different tracks in your mix. The channel faders are used to mix the audio signals from two or more channels, while the master fader controls the overall volume of the mix. Make sure to practice and experiment with different fader techniques to create a seamless and dynamic mix.
Crossfader
A crossfader is a powerful tool that allows you to create seamless transitions between two audio sources. By adjusting the curve of the crossfader, you can change the rate of the transition and create unique and engaging effects. For example, you can use a sharp curve for a quick transition or a gradual curve for a slow transition. Experimenting with different crossfader techniques can help you create a dynamic and engaging set that keeps your audience on their feet.
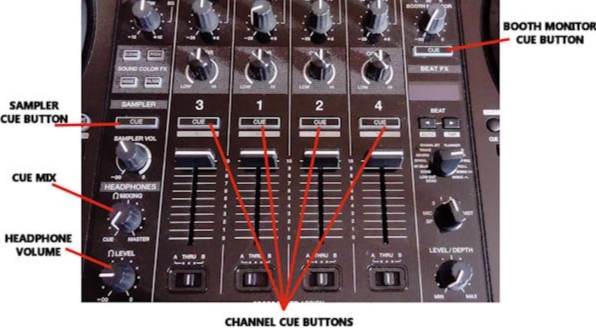
Cue Buttons
The cue buttons are a helpful tool for previewing a specific channel in your headphones before bringing it into the mix. This allows you to find the right place to bring in a track and ensure a smooth transition. Each channel has its own cue button, and there’s also a master cue button that lets you listen to the entire mix in your headphones, making it easier to monitor the overall sound of your mix.
Effects section
The effects section on a DJ mixer is a place where you can let your creativity shine. By experimenting with different effects like reverb, delay, or filters, you can add unique and memorable elements to your mix that will set you apart from other DJs. Don’t be afraid to get creative and have fun with it! Just remember to use effects in moderation and make sure they enhance the overall sound of your mix rather than detract from it.
Master output section
The master output section is where you can adjust the overall volume and tone of your mix before it is sent to the speakers. It’s crucial to make sure that the final mix sounds great through the speakers, so take the time to experiment with different settings until you find the right balance. Remember to constantly monitor the sound of your mix through the speakers to ensure that it sounds great for your audience.
DJ Mixer Buttons and Functions
Here’s a detailed explanation of each button and control on a DJ Mixer:
Gain knob
The gain knob controls the input level of each channel. It’s used to balance the volume of different audio sources to ensure that they’re at the same level.
High, Mid, and Low EQ controls
The high, mid, and low EQ controls allow you to adjust the frequency response of each channel. The high EQ control adjusts the high frequencies, the mid-EQ control adjusts the mid frequencies, and the low EQ control adjusts the low frequencies.
Channel Fader
The channel fader allows you to control the volume of each channel and mix audio signals from two or more channels. By moving the fader up or down, you can bring in or fade out different tracks in your mix, creating a seamless and dynamic sound. It’s crucial to practice and experiment with different fader techniques to find the right balance and create a mix that keeps your audience engaged.
Crossfader
DJs can use the crossfader to create unique and engaging effects by adjusting its curve and changing the rate of the transition between two audio sources. This can be done gradually or quickly, depending on the desired effect. Experimenting with different crossfader techniques can help a DJ create a dynamic and engaging set, keeping their audience on their feet throughout their performance.
Cue buttons
The cue buttons are one of the most helpful tools for DJs. By using them, you can listen to a specific channel in your headphones before bringing it into the mix. This allows you to find the right place to bring in a track and ensure a smooth transition. The cue buttons are also helpful for checking the sound quality of each individual channel. Remember that each channel has its own cue button, and there’s also a master cue button that lets you listen to the entire mix in your headphones.
Effects section
The effects section is a great way to add depth and interest to your set. Experiment with different effects like reverb or delay to create unique textures and moods. However, it’s vital to use effects in moderation and make sure they enhance the overall sound of your mix rather than detract from it. Try to find a balance between adding effects and keeping the mix cohesive and seamless.
Master Output Section
The master output section is where you can adjust the overall volume and tone of your mix before it is sent to the speakers. This section is crucial for ensuring that your mix sounds great through the speakers, so take the time to experiment with different settings until you find the right balance. Keep in mind that the volume and tone of your mix can affect the overall sound quality, so it’s essential to monitor the sound of your mix through the speakers and make adjustments as needed.
Tips and Tricks for Using a DJ Mixer
Here are some tips and tricks for using a DJ Mixer effectively:
- Use EQs to blend tracks: Use the EQ controls to adjust the frequency response of each channel and blend two tracks smoothly.
- Use the crossfader to mix tracks: Use the crossfader to transition between two tracks smoothly and create a seamless mix.
- Use effects to enhance your mix: Use effects to add depth and texture to your mix.
- Use the cue buttons to preview tracks: Use the cue buttons to find the right place to bring a track into the mix.
- Use the gain knob to balance levels: Use the gain knob to balance the volume of different audio sources.
When setting up your DJ Mixer, make sure that your audio sources are connected correctly and the levels are balanced. Also, make sure that your mixer’s output is connected to the speakers or PA system correctly.
Conclusion
Understanding the layout and controls of a DJ Mixer is crucial for creating a seamless mix. By understanding what each button and control does, you can use your DJ Mixer effectively and create a great mix. Remember to practice and experiment with different techniques to get the most out of your DJ Mixer.